


Support Tip: Staying on Track with Job Tracks

The following is performed in Bullhorn Novo.
Let’s face it: Your users don’t want to sift through a million unnecessary fields when adding records into Bullhorn. If you can make their job easier, you can make it more likely your team will use Bullhorn like you want them to. Let your users focus on what matters to them. Job tracks are one way to help your users stay focused when entering jobs into Bullhorn.
What exactly are job tracks? Tracks allow you to tailor which fields appear based on the type of job you’re entering. For example, consider the list below. Do all of these types of jobs need exactly the same list of fields to be filled out?
- Contract
- Contact to Hire
- Direct Hire
How can this help me?
To understand why tracks are useful, let’s briefly look at adding a job into Bullhorn. When we click +Add at the top of the screen and choose Job, we see this screen:
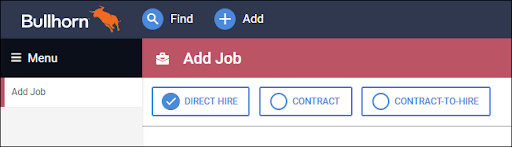
After we choose an employment type, such as Direct Hire, we’re prompted to add in the necessary job information before saving.
If we didn’t have tracks set up, we’d see every job field on the Add Job page, regardless of relevance to the type of job we’re entering. You know as well as I do that not every field is applicable to all employment types. For example:
Contract jobs have a pay rate and bill rate while direct hire jobs do not. Conversely, direct hire jobs usually have a salary while contract jobs do not.
If every single field was displayed while adding a job, things would start to look pretty cluttered. Luckily, we can avoid having a mile long Add Job screen through the use of job tracks!
Setting up the First Job Track
The following steps can only be performed by an administrator.
To begin, we’ll navigate to our Field Mappings. Field Mappings are within the Admin folder on the Bullhorn Menu.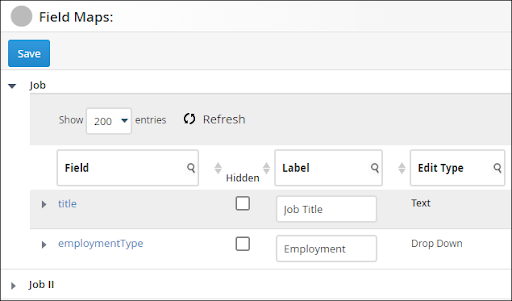
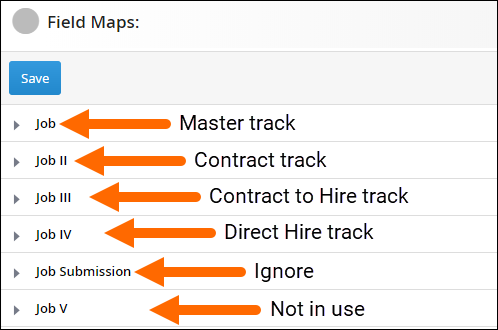
For this demonstration, we’re going to focus on two sections within Field Mappings: Job and Job II. We’ll begin by expanding Job, which is our first job track.
The employmentType field is the only one we’re worried about right now. Once it’s expanded, take note of the Value List.

This is where all employment types we deal with should be listed. If you notice that any are missing, add them! Just make sure to keep them comma separated with no spaces in between. 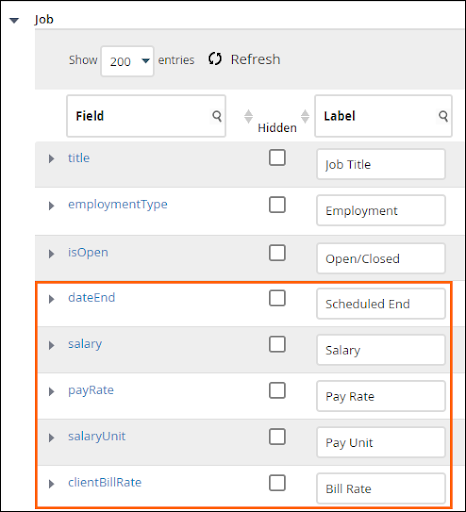
Think of the first job track as the “master track.” As in, it should contain every field we plan to use in all of our employment types. In our example, we configured the following fields in our master job track:
- Scheduled End
- Salary
- Pay Rate
- Bill Rate
Scroll through this list and set up every field you plan to use. If you plan to use the field for any job with any employment type, unhide it and configure it as you see fit.
Setting up Subsequent Job Tracks
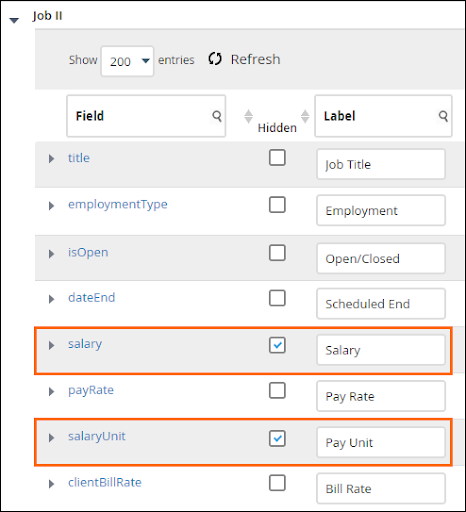
This is where our differing employment types come into play. Expand Job II and its employmentType field as we did above.
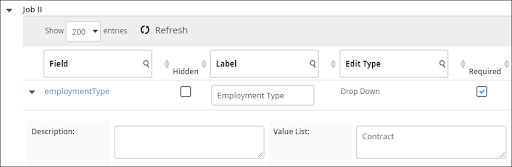
You may notice something different this time. The only value listed in the Value List is Contract. Contract was the first value listed in our master job track in the Setting up the First Job Track section above (Contract, Contract to Hire, Direct Hire). This is our contract job track, and as such, every field we configure will be related to contract jobs.
While every field was unhidden in the first track, we can hide all fields here that we don’t want to see when adding a contract job. Goodbye Salary field!
After setting up our contract job track, we’d do the same for the third and fourth job tracks. Which for us, our third would be for contract to hire jobs while the fourth would be for direct hire jobs. We wouldn’t use Job V as we don’t have a fourth employment type, so we would want to leave the employmentType field blank on that one. You can use it in your database though.
To sum up the example in this blog post:
Conclusion
Tracks are helpful to maintain a clean database as they can prevent a confusing user experience. Consider using tracks to cut down on the amount of fields users see when adding a job of any given employment type.
For additional information on tracks, check out this article.
If you get stuck along the way and you’re an Account or Support Contact, our Support Team will assist you.