


 Bullhorn’s marketplace of 100+ pre-integrated technology partners gives recruitment agencies the tools they need to build a unique, future-proof solution.


Support Tip: Master The Standard Bullhorn Hiring Workflow
")
Bullhorn’s hiring workflow is highly customisable but it’s a good idea to understand our out-of-the-box hiring workflow before you begin making changes. One of the best ways to become familiar with something is to see it in action, so let’s send our candidate Gwen Stacy through the hiring process as she looks for a job as a Java Developer!
Prescreen
When you first begin working with a candidate, you’ll want to collect their information and vet them. To get started, we’ll open Gwen’s record and click the Prescreen workflow icon to add one. If there’s already a prescreen attached to the candidate record, click the Actions drop-down at the top right of their record and add a note with an action of ‘Prescreen’. After all, a prescreen is just a note with a specific action!
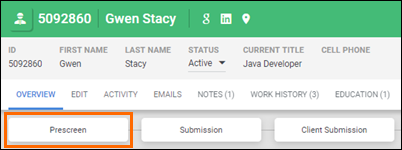
Now we’ll document the prescreen following our company’s normal procedures. We can even reference the job directly in the note by using a hashtag (#) and typing the name of the job (e.g. #Java Developer). This lets us easily access the job record when we view the note on Gwen’s record!

After we save, the Prescreen workflow icon light up.
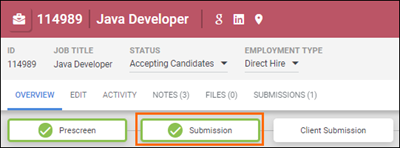
Submission
Once our candidate has been prescreened and we find the perfect position for them, we’ll need to internally submit the candidate to our account manager. This lets the account manager review the candidate before we submit them directly to the job’s contact.
From the internal submission onward, it’s recommended to work from the job record. This allows information to automatically pull from the job record so we don’t have to manually enter it. From the Actions drop-down on the job record, we’ll select Add Submission and fill out the applicable fields.
Once we save, it will return us to the job record where we’ll see the Submission workflow icon lit up.
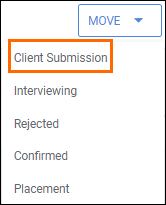
Client Submission
Once the account manager reviews Gwen and tells us how she’s a perfect fit for the job, we’ll now need to see if the job’s contact feels the same way. I’m of course referring to the Client Submission step.
From the Submissions tab on the job record, we’ll check the box next to Gwen’s submission we just made. From the Move drop-down that appears, choose Client Submission.
When the Client Submission screen opens, we have the option to compose the client submission with or without an email. We recommend sending an email, which is easy considering Gwen’s resume is already attached! After sending our email, we’ll be returned to the Submissions tab on the job record and our submission will be moved to the Client Submission section.
Interview
At this point, the contact will have at least one, but possibly several, interviews with Gwen before making a final decision. Once the details of the interview are worked out, we’ll want to log it in Bullhorn. From the Submissions tab, we’ll check the box next to Gwen’s Client Submission, and from the Move drop-down, select Interviewing. We can use the Notes field to document information related to the interview. To schedule the actual appointment, make sure the schedule appointment toggle at the bottom is set to Yes, and click Move.
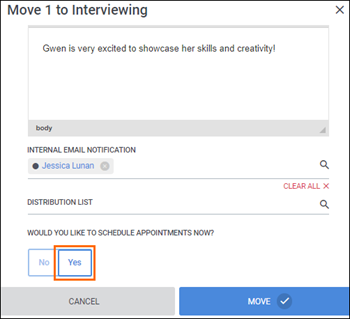
This opens the Add Appointment screen. Fill in the details as needed and save!
Just a quick note about the Attendees field and Notify Attendees option: this setting will send an email to everyone in the Attendees field and does not BCC. This means everyone in the field will be able to see each other’s email address. We recommend only adding the job’s contact to the field, and sending the candidate an invitation from their own record later.
Offer Extended
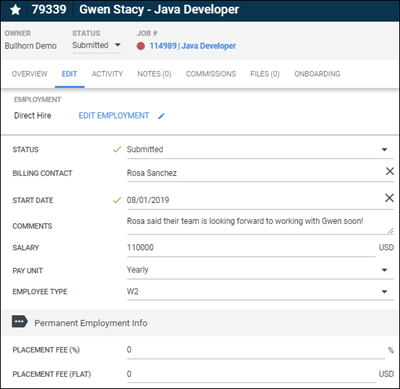
Once a decision is made, the contact will either offer Gwen the job, or reject her as a candidate. Let’s say Gwen was offered the job. We’ll want to log this against the job record in Bullhorn and let her know. From the Submissions tab, we’ll check the box next to Gwen’s Interview and from the Move drop-down, select Confirmed. We can use the Comment field to leave any notes, and select the option to edit the Submission if needed.

Once Gwen has accepted the offer, we can update the status to Offer Accepted before moving it to a Placement.
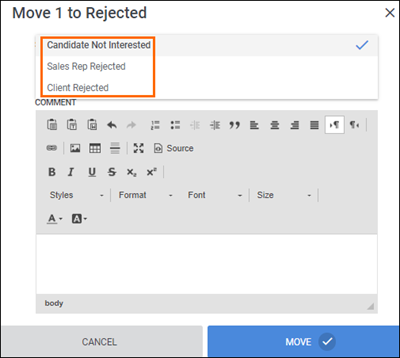
If the contact rejects Gwen or Gwen rejects the job offer, we’ll want to record this in Bullhorn by checking the box next to her Confirmed submission, then from the Move drop-down, select Rejected. From here we can select the appropriate status.
Placement
If Gwen accepts the job, we’ll want to create the placement in Bullhorn. From the Submissions tab, we’ll check the box next to Gwen’s Confirmed submission and from the Move drop-down, select Placement. This prompt has more options for us, including a Notes field and a number of Candidate Info fields to review and update as needed before selecting Move.
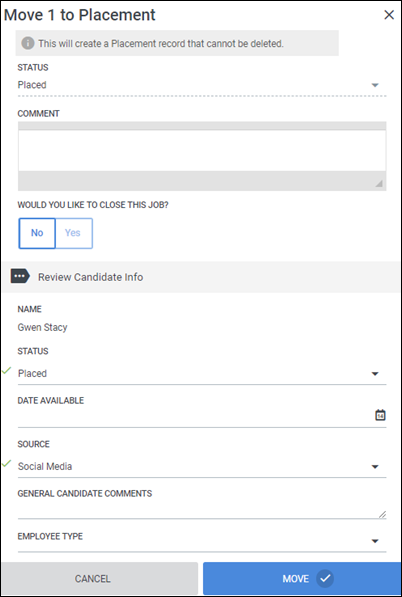
This opens the Placement for us to edit if needed, including any update to Gwen’s pay or placement fees, and once created, cannot be deleted.
And that’s it! Placing a candidate through Bullhorn is easy. For a helpful video series, check out the Hiring Workflow course in the Bullhorn Learning Hub.
Want to customise your hiring workflow? See this article for more details.
Keen to get the latest Bullhorn tips, product news, and updates straight to your inbox? Subscribe to the Customer Blog today and make sure you never miss a thing!