


 Bullhorn’s marketplace of 100+ pre-integrated technology partners gives recruitment agencies the tools they need to build a unique, future-proof solution.


Support Tip: Job Tracks

Business is booming at the moment, which is great, but along with that, we find demands on our time have never been higher. There is value in taking a step back to evaluate the basics – have I done everything I can to bring time efficiencies to my day-to-day work? Is there anything I could be doing differently that will help me, and my team, drive towards smashing our business goals?
Often we find that something which previously didn’t register as a priority is worth reviewing again – giving a little time to housekeeping within the Bullhorn database will always deliver value, whether you are brand new to our products, or veterans of Bullhorn with extensive knowledge of set-up capabilities, features and building processes tailored to your business needs.
Although using Job Tracks is optional, I haven’t yet come across a business that doesn’t see value in investing a small amount of time setting these up. In short, if you don’t currently use Job tracks, the Add/Edit screen will pull data fields from the ‘master’ Job track, and have all the same fields regardless of employment type.
The purpose of Job Tracks is to streamline the creation of a job record and ensure the data fields are relevant to employment type, removing the need to complete irrelevant fields.
Ultimately, this will bring time-saving efficiencies to your users – nobody wants to waste time reviewing unnecessary data fields – and help them to deliver accurate and relevant data during the job creation process.
Note: Only users with Admin rights can create/update Tracks.
A couple of tips to keep in mind, the process to set up Job Tracks is straightforward, using Field Mappings to create multiple job tracks that will display different fields depending on which employment type the user selects when adding the record.
- Example: You can have a Salary field display when adding a direct hire job/placement and Bill and Pay Rate fields display when adding a contract job/placement.
As a best practice, when setting up fields within tracks, it’s important that each field is used for the same purpose across all tracks. This isn’t a mandatory requirement, but is recommended as it helps when applying updates/amendments to specific fields,
- Example: If you use customText3 to create a Bonus field in Job II, you should only use customText3 for a Bonus field in Job III, IV, and V.
Below is an overview of how to set up Job Tracks that are relevant to your business, for further details, please refer to this article.
Creating Multiple Job Tracks
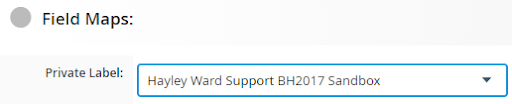
Access Field Mappings from your Bullhorn menu (Admin – Field Mappings)
Hint: If your business has multiple Private Labels, ensure the correct one is chosen using the drop-down arrow:
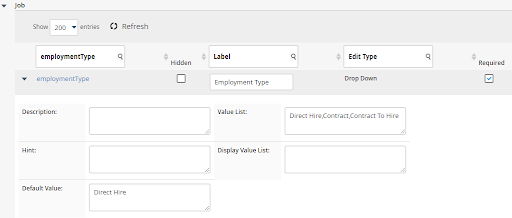
Click the arrow to the left of the first Job track: Job
(Note: Your business may have renamed the Job entity to Vacancy / Assignment etc)
This is the ‘master’ field list for all Job tracks, you use the subsequent job tracks to define the characteristics of each employment type. Note: all fields must be unhidden in this track to appear on other tracks.
Add a filter to the Field box: employmentType to determine your list of employment types already in place:
Add new job type names to the Value List as required:
Hint: you should keep the order of the employment types in this field the same order that the employment types are listed in the subsequent job entities.
i.e. Direct Hire = Job II Contract = Job III Contract to Hire = Job IV
Once you have added all relevant types in the master value list, you can then go into each Track and add each employmentType in the Value List box: i.e. Job II Direct Hire:
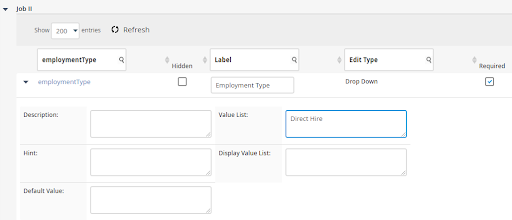
Remember, whilst in the relevant job track, you should hide & unhide all fields applicable to that job track.
Note: Repeat these steps for all job tracks/employment types for your business.
Three Tips For Success
- To verify if you already have Tracks set up, check if employmentType in Track II is empty, then check Tracks III, IV, and V. If all are empty, you don’t have Tracks set up.
- When updating the employmentType Value List, be sure to separate the values with commas and no spaces in between, i.e. Direct Hire,Contract,Contract To Hire.
- Once you have completed your set-up and hit Save, make sure you log out and log back in again to see changes.
Good to know…..
Whilst you are giving time and attention to getting your Job Tracks up to speed, I should also point out that Tracks are also available in the Placement entity and the Opportunity entity (Opportunity for Enterprise edition only).
Note: While Job tracks are standard functionality, you must contact Bullhorn Support to have Placement tracks enabled.
As a best practice, and because many of the fields on a placement record are correlated to the fields on a job record, they should also share the same purpose. I recommend matching each employment type as well.
- Example: If Job II represents Direct Hire jobs, then Placement II should be for Direct Hire placements.
The creation of Placement and Opportunity Tracks follows the same process as listed for Jobs, and more details can be found in the article listed above.
As with any change you make within Bullhorn, ensure you give time to explain the changes to your wider user teams. Your business will benefit from users being aligned in their processes, to deliver your goal of time efficiency and improved accuracy, bringing confidence to users that they’re doing the right thing!
More information
Bullhorn’s Community and Learning Hub are great training resources I would encourage everyone to bookmark and refer back to often.
If you need assistance with updating anything covered here and you are an Account or Support Contact please reach out to our Support Team who will be happy to help.
For more trends, tips, and insights delivered straight to your inbox, subscribe to our Customer Blog.