


 Bullhorn’s marketplace of 100+ pre-integrated technology partners gives recruitment agencies the tools they need to build a unique, future-proof solution.


Integrating your email with your Bullhorn ATS

In previous Support Tips, we’ve covered the features inside of your Bullhorn ATS and how to optimise the usage of your database. Now, let’s dive into some of the features related to using your own email setup in conjunction with your Bullhorn database.
Tracking your emails in Bullhorn
Of course, you can leverage your Bullhorn database to track conversations, manage your pipeline, and bring candidates through the workflow process. That’s not all, though; you can also use Bullhorn to track email engagement with your client or candidates by enabling Email Integration.
Let’s go straight to the core of the feature: you can continue using your own email set-up (Office 365 or Gmail) to send emails to your clients and candidates, and these emails will be automatically stored in your Bullhorn environment under the emails tab of the related record.

This integration tracks outgoing emails from yourself to external recipients as well as incoming emails. The emails tab distinguishes these by displaying different colored arrows, pointing in different directions.
Before the Email Integration is fully functional, we need to look at a couple of requirements:
- You must complete all the steps for email integration in your email admin center for Office 365 or G-Suite for your email domain.
- You must have an email address associated with your Bullhorn user account for the same email domain.
- The person you are emailing (or who is emailing you) must have a record in Bullhorn and an email address associated with that record.
Email integration is a fantastic feature, but do also bear the following in mind:
- Bullhorn performs real-time email tracking; this means that emails exchanged prior to your company integrating their email with Bullhorn will not appear in the system.
- Bullhorn cannot track emails for addresses that your company does not own. This means that free email providers such as gmail.com, outlook.com, or any of a variety of free email providers cannot be used with Bullhorn email tracking.
- You can see emails your coworkers exchange with individuals saved to your database. Email tracking does not normally show internal emails (between you and your co-worker) that do not include external individuals.
Using the Bullhorn for Email gadget/add-on
The Bullhorn for Email Outlook gadget or Gmail Add-on allows you to take action on emails from within your email application. In order for the Gadget to work correctly, your email tracking must be set up first.
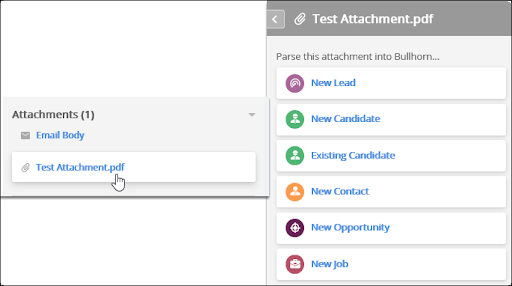
So what can you do with this gadget? To be able to use this feature, you will first need to select an email in your inbox you want to take actions on. The gadget will search your database for the sender’s email address to locate the associated record.
Following this, you can:
- View recent notes for candidates, contacts, and leads as well as candidate resumes and open jobs.
- Parse attachments into Bullhorn as a new or existing record.
- Open a record in Bullhorn.
- Add notes and tasks to records (Gmail only).
- Use the Social Media button to go directly to the candidate’s or contact’s publicly viewable social media profile (Gmail only).
Further information on using the Outlook gadget can be found here; for Gmail, please have a look at this article.
Sending emails from within Bullhorn
So far, we’ve looked at how to use external email providers in conjunction with Bullhorn. Now, let’s have a look at some best practices for sending emails from within Bullhorn.
Before sending any emails from Bullhorn, you will need to ensure your SPF Records are updated. Some email providers will look for a Sender Policy Framework (SPF Record) to verify that the email they are receiving is an email sent by the actual sender and not a forgery sent by a spammer or otherwise unsavory character.

Updating email records is usually done through your domain host. You may need to contact your IT or domain host support for assistance in performing this update.
If you have access to where your email is hosted, you can simply follow these instructions to update your SPF records.
Secondly, you will need to ensure that your signature has been added into Bullhorn. To set up your default signature, you will need to head over to your preferences. A couple of tips when adding this in:
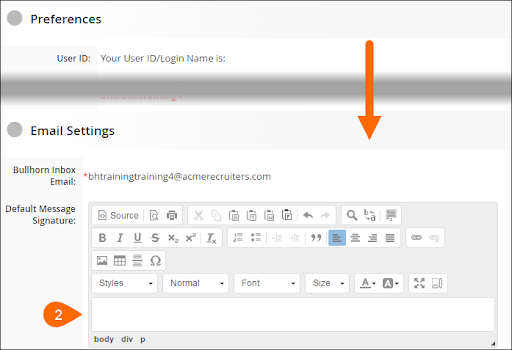
- If you are copying and pasting text from an external source, use one of the paste buttons within the editor.
- To insert a single-spaced line, press Shift + Enter.
- Including images in your message signature requires you to have an image URL:

- You can link an image or text to an external site (such as your LinkedIn profile), by highlighting the image or text and select the 🔗 icon. Paste the URL into the URL field and click OK.
- If you have your entire signature in HTML format (source code), you can add this in by clicking on the source button, paste the HTML, and click on source again.
You also have the ability to add secondary signatures for use in different contexts. Secondary signatures are available to use and edit from the Signatures drop-down on the Compose a Message screen. Further information on signatures can be found here.
Once your SPF records have been updated and your signature has been added, it’s time to start emailing from Bullhorn!
Individual emails
Your standard setup will most likely be the following: for individual emails, launch desktop mail client to compose email. This means that if you click on an individual email address or go to a person’s record → actions → email, your default email app will launch.
If you would like to be able to send all individual emails from within Bullhorn (without launching your default app), your administrator can change this for you in your user preferences.

Mass mails
To send emails to a group of contacts, leads, or candidates in bulk, have a look at the following blogs, which go through this in detail: