


Support Tip: 3 Ways to Get the Most out of Field Mappings

This article is intended for administrators on the Corporate or Enterprise Edition of Bullhorn.
As a Bullhorn administrator, it’s up to you to maintain the fields in your database as well as ensure your users are using the fields in the ways that you intend. There’s a lot of work that goes into creating the fields, specifying defaults, deciding where they show on records, and keeping track of how users are using them.
By now, you’re certainly familiar with configuring fields in Bullhorn, but there’s always more to learn! That’s why I want to share three tips to help you get the most out of Field Mappings and become the Field Mapping wizard you were always destined to be! The tips we’ll explore today are designed to get you thinking more creatively about ways to add some pizzazz to your records.
Tip 1: Creating a URL Field
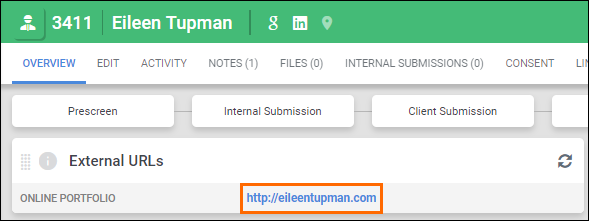
These days, it seems like everyone has a presence on the internet and as a result, many people use online portfolios to showcase their work. Your recruiters may want to view a candidate’s online portfolio directly from their record in Bullhorn. To do this, we’ll create a URL field.
The first thing you’ll do is open Field Mappings and expand Candidate. Type “customtextblock” in the Field box and click enter on your keyboard. Creating URL fields only works if you use this type of field. Select the field name hyperlink for an available Custom Text Block.
You can adjust this field as you see fit, but keep in mind that the Edit Type must be DHTMLEditor for this to work. Make sure to give it a name, a sort order, and unhide it. After saving, let’s open a candidate record and check out our new field.
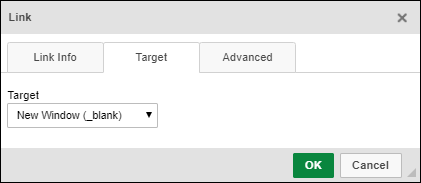
We’ll begin by locating our field on the Edit tab. In the toolbar, click the link icon, shown below, to add the URL:
![]()
After adding the URL, go to the Target tab and select New Window from the drop-down. This ensures that clicking the link opens it in a new tab.
As long as the field is set to appear on the Overview tab on your records, clicking the hyperlink will open the website in a new tab.
Tip 2: Using Section Headers

Obvious as it may seem, I rarely see Section Headers getting the love that they deserve. Out of the box, Bullhorn provides a number of premade Section Headers and the option to create your own to group similar fields.
Back in Field Mappings, expand the desired entity and filter the Field column for “header”. Using a sectionHeader field, perform the following steps:
- Unhide the field.
- Give it a Label.
- Adjust the Sort Order so that it appears above the fields you want to group together.
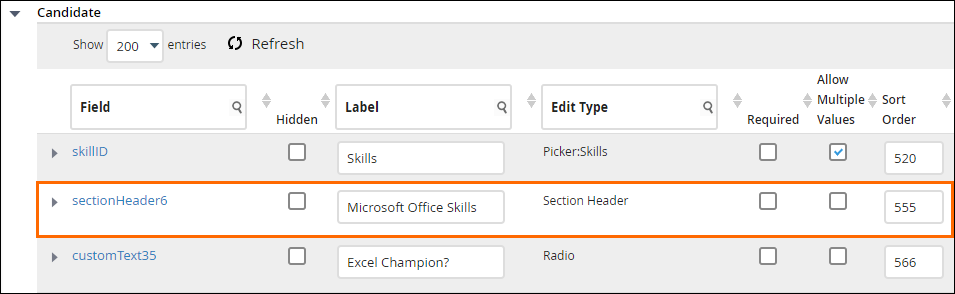
Notice that I gave it a label of Microsoft Office Skills and sorted it so that all related fields display underneath it. Try adding a Section Header to improve the look and feel of your records!
Tip 3: Creating Templates

Minimising “bad data” in your database starts with data integrity, which is, of course, up to your users entering data in Bullhorn. As an administrator, you can assist in this effort by templatizing fields so that users know how they should be entering information.
Let’s use another Custom Text Block to create our template. In Field Mappings, find an available Custom Text Block and give it an Edit Type of DHTMLEditor. Use the Default Value field to create your template.
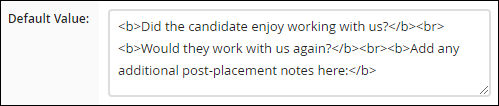
In my example, this field is designed to house post placement information on the candidate record. Notice how I used HTML to format the information. You can do this too as long as you stick to basic HTML.
Now when a user adds or edits a candidate record, they can use the template to make sure the information they add to the field is consistent with how other users add it.
While I showed you three things you can do to get the most out of Field Mappings, there is so much more that Field Mappings can do! I recommend checking out the Field Mappings section in our Customer Community to learn more.
Looking for more learning content? Visit the Customer Community to log into the Bullhorn Learning Hub.
Keen to get the latest Bullhorn tips, product news, and updates straight to your inbox? Subscribe to the Customer Blog today and make sure you never miss a thing!
