


Support Tip: Searching Best Practices for Optimal Results

Whether you have recently set up your own recruitment business or have been established for several years, every client knows what their key asset is: data. Carefully selected and gathered information on your clients and candidates is extremely valuable and is what holds all parts of your Bullhorn ATS together.
Whether you’ve added your data manually or have conducted a large data import or migration, the most important next step is to be able to retrieve this data in the most optimal way: quickly, efficiently and accurately.
Understanding Bullhorn’s searching capabilities is the first step toward getting these outcomes.
Keyword Searching
Let’s start by opening our candidate list and before you conduct any search, please ensure you check the upper right-hand corner for the big red ‘Clear’ button. Clear out any filters or search criteria so you can begin with a fresh search.
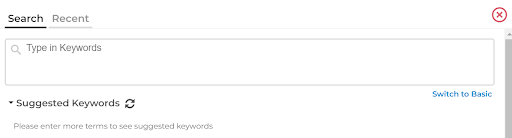
When we select the search box at the top, we should see a large keyword area — this is the advanced side of the tool. If you are someone who uses Boolean logic to put together your search string, this would be the place for you. If you want to find out more about Boolean logic, please have a look at the article here.
If you are not a Boolean logic expert, you can toggle to the basic view where Bullhorn provides a search filter to put together your search string.
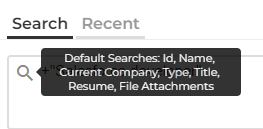
In the Advanced Searching functionality, you will see a magnifying glass, hovering over this with your cursor will show you where Bullhorn is searching for those keywords: ID, Name, Current Company, Type, Resume, Title and any File Attachments.
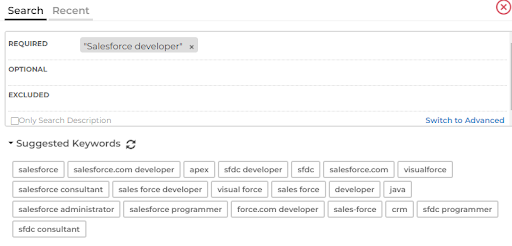
If you have switched to the basic search functionality, you can easily add keywords in any of the three rows: Required, Optional or Excluded. Typing in a keyword followed by pressing enter ensures this keyword is now locked in.
The Optional field is a great way to add ‘nice to have’ skills or terms that might have a variation in spelling.
You might see a little checkbox on the left-hand side for “only search description” — ticking this box ensures that Bullhorn only searches for the keywords on the resume/CV card of the overview tab on the candidate record. So NO OTHER fields will be included in this search.
Suggested Keywords: you might want to take advantage of this when you are building out a search string. Bullhorn will provide you with a list of terms based on the keywords that you’ve already entered into your search. You will then be able to drag and drop some of the keywords into your search. For example, if you are new to recruiting or to a specific industry, this could be very useful to expand your knowledge base and search, using only a few keywords.
For more information on Keyword searching, please have a look at the article here.
Now, let’s enhance our search and narrow down the results to a more manageable size by focusing on the additional criteria search tool.
Using Additional Criteria
Underneath the additional criteria header, you will see the option to add multiple different search fields. Clicking on the arrow to find a field to search, you will see all the fields in alphabetical order and literally everything is searchable! You can either scroll up and down to find the relevant field, but I find it much easier to type in what I need at the top search box.
Most fields will give you the option to either include all (absolutely required), including any (one or the other) or exclude.
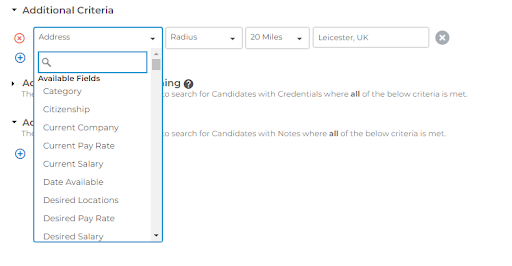
If you want to focus on where your candidates live, you can search the address field with a radius option. Radius searching is a great tool, but records will only return in this search if they have a zip code / postal code as part of their address.
You can combine keyword searching with the additional criteria search to build the strongest searches and return the most optimal results!
Recent and Favourite Searches
Building searches can be done really quickly once you get the hang of it. However, maybe a few days ago you put together a really great search, based on several keywords and additional criteria and you would like to run this search again today.
Rather than trying to remember the exact combination of criteria, you can click on your search bar at the top of your list and now click on Recent. Here, you will be able to find your most recent searches and re-run these very quickly!
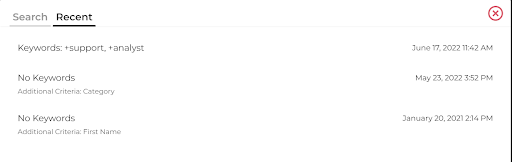
These recent searches display any search you’ve recently conducted, no matter how important or relevant for you. To be able to save your most relevant searches, you can use Favourites.
In your list, head over to the favourites dropdown at the top. You can now give this search a name and decide whether you want to keep it Private or Public.
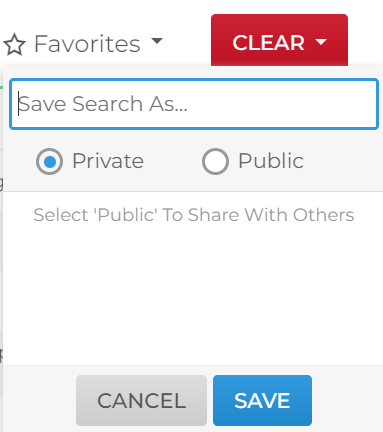
Favourite searches are dynamic in nature, meaning they will always give you the most up-to-date results.
Search Results
Once you have conducted your search and returned to your list, you might see your candidates organised, based on their score.
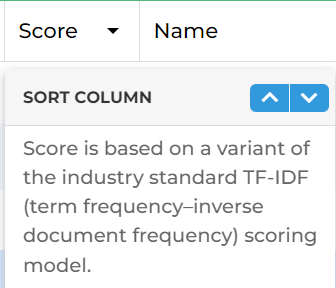
The Score column can give you one additional piece of criteria to consider and clicking on the column header gives you a bit of information on how the score is defined.
To put it in simpler terms, it is looking at how frequently the search terms appear, not only on the resume/CV but also in your database as a whole. The more frequently those keywords appear, the higher the score will be.
To find out more about how scores are calculated, have a look at this article.
Once you have your search results, you can always click the binoculars on the left-hand side of your list for a snapshot of the details and all activity related to this candidate. When toggling over to the “Resume” or “CV” tab, you will see all your keywords – which you defined in your search earlier – highlighted for you. This is another great way to determine whether a candidate might be the right fit for the role you are looking to fill.
Advanced Note Searching
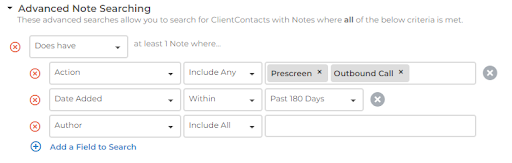
So far we have been focusing on searching with the candidate profile, but did you know that you can also conduct an Advanced Notes Search?
To illustrate, let’s have a look at searching for the right contacts, instead of candidates. This is especially useful if you are focused on the sales side of the business.
In our Contacts list, we head back to our search bar at the top and we will focus on the Advanced Note Searching section. There, we can have a look at searching within the notes that have been added to your contact records.
You can either choose whether or not you want to include this note type into the search and then select any of the note actions you’d want to see. For example, you can use this if you want to find any contact, which has a note action of “BD Call” added to their record in the past 6 months.
This is a very different type of search but very useful if you are looking for contact with a specific notes history, rather than conducting a keyword or specific field search.
Further information on advanced notes searching can be found here.